Showing posts with label Windows 7. Show all posts

Monday, April 11, 2011

Backup Windows Part 3 -- xcopy

Let's briefly discuss a quick way to backup Windows. I use a batch file that I wrote to quickly backup clients' PCs.

Here it is:

xcopy /c /d /e /h /i /r /y "%USERPROFILE%\Favorites" "%COMPUTERNAME%\%USERNAME%\Favorites"
xcopy /c /d /e /h /i /r /y "%USERPROFILE%\Desktop" "%COMPUTERNAME%\%USERNAME%\Desktop"
xcopy /c /d /e /h /i /r /y "%USERPROFILE%\My Documents" "%COMPUTERNAME%\%USERNAME%\My Documents"
xcopy /c /d /e /h /i /r /y "%USERPROFILE%\Documents" "%COMPUTERNAME%\%USERNAME%\Documents"
xcopy /c /d /e /h /i /r /y "%USERPROFILE%\AppData\Local\Microsoft\Outlook\*.pst"
xcopy /c /d /e /h /i /r /y "%USERPROFILE%\Local Settings\Application Data\Microsoft\Outlook\*.pst"

echo Backup Complete!
@pause


This quick script copies the user's Favorites, Desktop, My Documents(Documents in the case of Vista and Windows 7) and the Outlook .pst file.

This script will work for either XP or Vista/Windows 7. The /c switch tells xcopy to continue even if it confronts an error. Therefore, when running this script on Windows 7, xcopy simply moves on when it does not find the My Documents folder. Of course, the inverse is true when running the script on XP.

This can be used for migrations or as a regular backup. The /d switch tells xcopy to only copy files that have changed since a certain date. If no date is given, as above, only the files that have a newer source time than the destination will be copied.

Obviously, changes can be made to customize the script as needed. For instance, the entire user profile can be backed up. Also, additional folders, such as the Firefox profile, can be added.

I run this script from an external USB drive and all of the data is copied to that drive. Again, customize the script to copy files to a different location.

Be sure to type xcopy /? at a command prompt to learn what each switch does and also to learn about the switches not included in the above.

If you want to use the above backup script, copy and paste it into notepad and save it as backup.bat. Double-click the file and you're backing up.

Saturday, April 2, 2011

Backup Windows Part 1 -- Backup and Restore

A couple of days ago was National Backup Day. Okay, we are a little late. Plus, a quick Google search will reveal several National Backup Days. Nevertheless, I was inspired to post a multi-part post on different methods for backing up Windows.

In Part 1, we will discuss using Backup and Restore. Backup and Restore is available in both Vista and Windows 7.

Creating The Backup


Backup and Restore is located here: Start>All Programs>Maintenance>Backup and Restore. Or simply type, "Backup and Restore" in the Search programs and files dialog box at the bottom of the start menu.

The first time that Backup and Restore is run, the backup must be set. Click the Set up backup button.


When the Set Backup Window pops up, select the drive that will serve as the backup drive. This must be a different physical drive from the one that is being backed up. Backing up to a different partition on the same physical disk does not make any sense. If the drive fails, all of the partitions fail and your backup is lost. You may choose a different physical disk in the same computer, a drive on the network, an optical drive, a virtual hard drive(VHD), or a USB drive. This can be changed in the future, if needed.

You will then be given a choice of weather to let Windows choose what to back up or choose yourself.


Explore the options and decide for yourself what best suites your needs.

Once the backup is set, press the Backup now button or schedule a time for backups. The time chosen for backup must be a time when the backup drive is available. Otherwise the backup will fail.


The amount of time that is taken for the backup will depend on how much data you are backing up. If this is the first backup and there is a lot of data, it can take well over an hour.

That's all that needs to be done. Just let it complete.

Restoring From The Backup


To restore a file or folder, open up Backup and Restore and click the Restore my Files button.


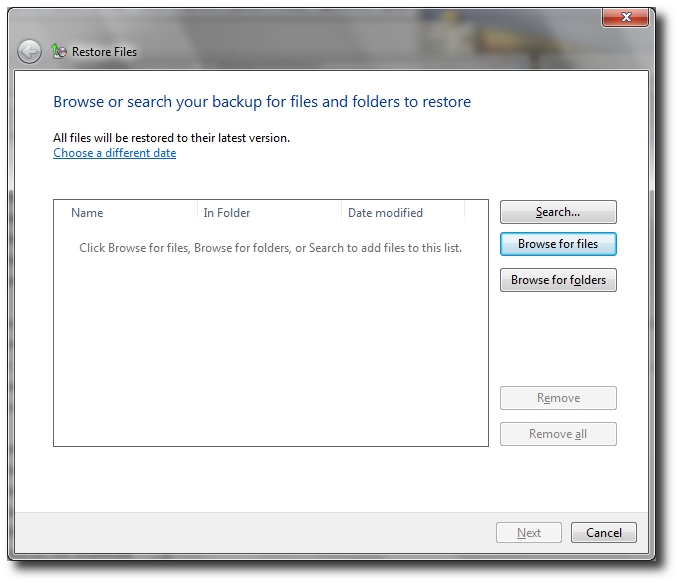
A window will popup that allows you to browse or search your backup for files or folders that you need. You can choose a different date to restore from as well.

Once the file(s) are selected, click Next. A new window pops up allowing you to choose weather to restore the file in it's original location or to another location.

That's it. Let it restore the files.

Backup and Restore can also create a system image. More on that in a future post.

Sunday, March 20, 2011

Changing Forgotten Window's Passwords

Often times a user will forget their Windows login password. Of course, often times that user will be using the sole administrator account on the computer.

When I am in this situation, I use the Ultimate Boot CD for Windows to reset the password. There are other tools to accomplish this, but UBCD4win is an extremely handy multi-use tool that I think every tech should have in their arsenal. The CD's uses include repairing systems that fail to boot, malware removal, running chkdsk, and a host of others.

Point your browser to http://www.ubcd4win.com/ You'll find everything you need to know to build your own CD.

To reset a password, boot up your CD and open NTPWEdit. One can find it under Start>Programs>Password Tools>NTPWEdit.


Once the application is open, make sure that the path to the SAM(Security Accounts Manager) file is correct and press (Re)open. This is almost always, C:\WINDOWS\system32\config\SAM. If it is not correct, make the necessary changes and then press (Re)open.


A list of accounts will appear. Choose the appropriate account and press Change password. Type the new password in the dialog box that pops up and then verify it by typing it in a second time. If you want a blank password, leave the fields blank and simply hit enter.


Make sure to press Save changes before exiting. Otherwise, well, your changes won't be saved. That's it. Reboot and log into the account. This works on XP, Vista, and Windows 7. It probably works on NT and Windows 2000, as well.


Saturday, March 12, 2011

Back up and Restore Network Printers

Often times in the enterprise environment, when a new PC is deployed, the technician has to set up the network printers that the user had on their previous machine. Often times this can be a fairly long list of printers. Rather than making a note of each printer and restoring them one at a time or dragging the short cuts to a share, the technician can back up and restore a registry key. This key is:

HKEY_CURRENT_USER\Printers\Connections

There are couple of easy ways to back up this key on the old machine and restore it on the new machine.

Method One

Goto Start>Run>REGEDIT

Navigate to HKEY_CURRENT_USER\Printers\Connections

Right-click the folder and select Export. Save the .reg file on a network drive or an external hard drive.


Log on to the user's account on the new machine and simply double-click the .reg file. Confirm that you want to add the settings to the registry.

In XP, goto Printers and Faxes. In Vista and Windows 7, goto Devices and Printers. Right click on each printer and select Connect. Right-click on the printer that is to be the default and select Set as default.

Method Two

One can also backup the registry key from the command line. The following command will backup the key to the \\server\share network path. Be sure to put quotes around any paths that have spaces in them. Obviously, modify the command to meet your needs.

REGEDIT /E "\\server\share\printers.reg" "HKEY_CURRENT_USER\Printers\Connections"

On the new machine, follow the above directions to restore the network printers.

That's it. You can incorporate method two into a .bat file if you wish.


Monday, July 26, 2010

Use One DVD to Install All Editions of Windows 7

PC Technicians need to have the ability to install any edition of an operating system that is called for. Windows Vista allowed one to install any edition with one disk. Unfortunately, with the release of Windows 7, Microsoft has removed this ability and left us needing a disk for each edition or SKU(stock-keeping unit). In other words, if you have a Windows 7 Home Premium Edition DVD and need to install Professional, you would need to purchase an additional DVD. However, there are a couple of hacks to get past this.

Please, understand. This is NOT a way pirate a copy of Windows 7. If you install Windows 7 Ultimate, you need an Ultimate key. Period. Your Home Basic key will not work. This method is used to make things easier for technicians.

First, make a directory in the root of your C:\ drive and call it dvd_files and another directory named win_iso. Copy ALL of the files from your install DVD to the newly created dvd_files directory. Now, in the dvd_files directory, navigate to the sources directory and delete the ei.cfg file.


Right, that's it. When this file does not exist, when installing Windows 7, you will see a menu asking which edition of Windows 7 you want to install. You can also edit this file to install a different edition. But, just delete it and you can choose from all of the editions.

Now, we need to make an ISO that can then be burned to a new DVD.

If you don't have Microsoft Windows Automated Installation Kit(AIK) installed, download the iso, burn it to a disk, and install it now.

Once it's installed, from the Start Menu, open Windows AIK's Deployment Tools Command Prompt. Enter the following command:

oscdimg -n -m -bc:\dvd_files\boot\etfsboot.com c:\dvd_files c:\win_iso\windows7.iso

There is NO space between the b and the c. That is NOT a typo. The -n switch allows long file names. The -m switch ignores the maximum size of an image. The first path is to the boot image that the DVD will use. Then next is to the files that will be used to create the ISO. The last is where the ISO will be created. Here's more, if you want to delve deeper into oscdimg.

You may wonder why the Windows AIK is needed. If you use third party tools to create an ISO from the files in dvd_files, it will be incompatible with some older motherboards. The disk will not boot, instead you will receive an error something like, CDBOOT: Cannot boot from CD - Code: 5. This is because Microsoft's "ETFSBOOT.COM program does not handle file versions according to the International Standards Organization (ISO) 9660 specification." Read more about it at Microsoft's website.

Burn the newly created ISO with your favorite third party software and you're done. You can now install any edition of Microsoft Windows 7 using one DVD.

Wednesday, June 23, 2010

Importing Outlook Data

When a new PC is purchased or the operating system is reinstalled, one common task is importing Outlook data. This is how all of your emails, calendar, contacts, tasks, and notes are saved. This isn't as difficult as some think. After setting up the email account, the .pst file, or Personal File Folder, needs to be imported.

First, make sure that hidden files and folders can be viewed.

To do this in XP, open My Documents (or any Windows Explorer window) and choose the Tools menu, then Folder Options. After the Folder Options window opens, select the View tab and then select 'Show hidden files, folders, or drives.' Press the Apply button and then OK.

In Vista and Windows 7, open My Documents (or any Windows Explorer window) and click 'Organize.' From the drop down, select 'Folder and search options.' After the Folder Options window opens, showing hidden files is the same as XP.


You can also find Folder Options in the Control Panel. This works on XP, Vista or Windows 7.


Depending on who will be using the PC, you may want to set it back to hiding files and folders after you have backed up the .pst file.

Now we can locate the .pst file. Navigate to:

In XP:

drive:\Documents and Settings\<user>\Local Settings\Application Data\Microsoft\Outlook

In Vista or Window 7:

drive:\Users\<user>\AppData\Local\Microsoft\Outlook\

Replace 'drive' with the drive on which Windows is installed. This is almost always C:. Replace <user> with the user name that you are currently working with.

You are looking for the .pst file. It is usually called Outlook.pst.

Back this up to a network drive, flash drive, optical media, or external USB drive. Of course, if you are to reinstall the operating system this must be done before formatting the hard drive.

Now, on the new PC or freshly installed PC, open Outlook, choose the File menu and then 'Import and Export...'


When the Import and Export Wizard window opens, select 'Import from another program or file' and then 'Next.'


After the 'Import a file' window opens, scroll down and select 'Personal Folder File(.pst)' and then 'Next.'


Select 'Browse' and then browse to the location of the .pst file that we backed up earlier. If this is in fact a fresh install or a new PC, it does not matter what you select as far as importing duplicates. Now, click 'Next' and your old emails, calendar, contacts, tasks, and notes have been imported.


Friday, November 27, 2009

Protecting Your PC From Malicious Software

New threats are unleashed upon the internet each day. In this article, threats or malicious software (or malware) refer to a computer virus, worm, trojan, adware, scareware, or any other computer program designed to compromise your Personal Computer. Although, nothing is 100% foolproof, there are a few simple things that you can do to help keep your PC safer.

Install Anti-Virus Protection

First and foremost, install, run, and keep updated a good Anti-Virus program. I recommend AVG, Avira, Avast, or Microsoft Security Essentials. The first three have a free and a pay version. The pay versions offer a little wider protection. However, I recommend any of the three free versions for solid, basic protection. The fourth is a good, new, free product produced by Microsoft that is also worth considering.

You are, obviously, not restricted to these suggestions. But, you must choose something. Whatever your choice, make sure that you keep it running and up-to-date.

Keep Your System Updated

As new vulnerabilities and bugs are discovered, software companies issue patches, hotfixes, service packs, or updates to repair them. Keeping your software up-to-date is critical to protecting your system. As well as the security updates, you will also want to download and install any non-critical enhancements and added features.

Luckily, keeping Windows up-to-date is pretty simple. To immediately update your Windows XP system, follow this path, illustrated in the following short-hand:

Start>All Programs>Windows Update.
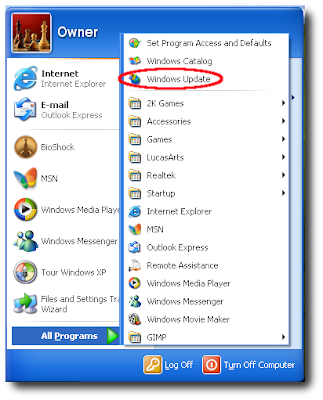


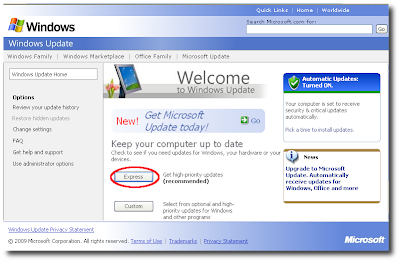
Select the Express method, then download and install the updates.


For Vista or Windows 7:

Start>All Programs>Windows Update.
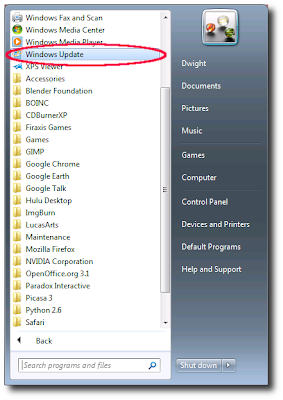

Check for updates. Then download and install them.
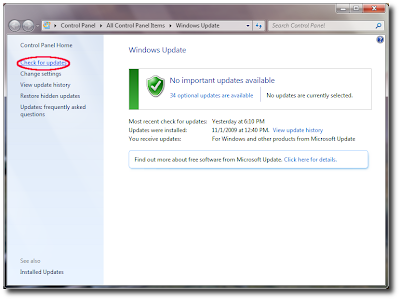
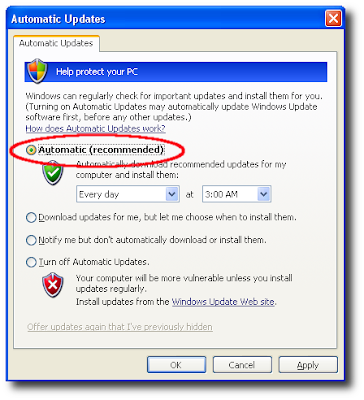
But, even better than that, you should set your system to automatically update it's self. This is easy, as well. In Windows XP:

Start>Control Panel>Security Center>Automatic Updates>Select 'Automatic(Recommended)'


For Vista or Windows 7:

Start>All Program>Windows Update>Change Settings>
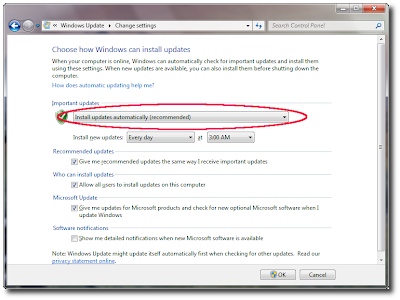


To keep up with the latest and greatest innovations on the internet, as well as the latest threats, your web browser must be kept up-to-date, too. If you insist on using Internet Explorer, following the above advice will keep your browser up-to-date along with Windows.

Other browers will keep themselves updated. You might see a pop-up asking you if you want to install updates now or later. Install them as soon as possible. You can check to make sure that you have the latest version on most browers: Help>Check for Updates...

Below is an example of Firefox's Software Update window.


Be sure to keep your Adobe products updated, as well.

To update Adobe Reader, again: Help>Check for Updates...
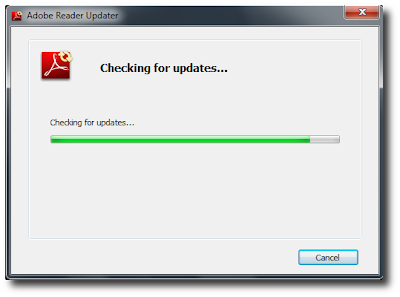

Check to see which version of Flash you have installed here. If you do not have the most recent version, download and install it.

Avoid Scams

Whether it's a link on a web site, in an email, in a chat room or a forum post, if it sounds too good to be true, it more than likely is. Avoid clicking any links congratulating you for winning a lottery that you didn't enter or offering free movie or music downloads. A lot of these sites host malicious software.

Be sure to avoid the scare tactics, too. Don't click on any links warning you that you are infected or that your system has been compromised. These are often scams looking to install malicious software on your PC or to get their hands on your wallet one way or another.

Logon With Limited Access

A study conducted a few months ago found that 92% of the vulnerabilties patched by Microsoft in 2008 could have had less impact if the users did not have administrative rights.

Here's what I suggest, give everyone that uses the computer an account with 'limited access.' The accounts with limited access will not have the ability to install new hardware or software. Therefore, you'll have to have one account with administrative privileges. Logon with this account only when you need to add a new account, install new software or hardware, or some other administrative task. Logon with the restricted account to check email, play online games, surf the web, or whatever you need to do on your computer.

Although there are registry hacks to show the Administrator account on the Welcome Screen, you'll probably find it easier to just create another account,
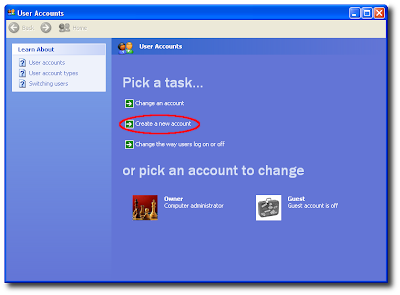


Give your new account a name, make the account type Computer Administrator, and create the account. After this new account is created, logon to your old account and change your account type to limited. Be sure to change any other user accounts to limited, as well.
You should give your new account a password if anyone besides yourself will use the computer. This includes anyone from co-workers to your kid's friends.

Thanks to Tim Biden for Tweeting about this study. Be sure to follow him.

Conclusion

As stated earlier, nothing can keep you 100% safe from the malicious software on the internet. But, following the above advice will tilt the odds in your favor.