Monday, July 26, 2010

Use One DVD to Install All Editions of Windows 7

PC Technicians need to have the ability to install any edition of an operating system that is called for. Windows Vista allowed one to install any edition with one disk. Unfortunately, with the release of Windows 7, Microsoft has removed this ability and left us needing a disk for each edition or SKU(stock-keeping unit). In other words, if you have a Windows 7 Home Premium Edition DVD and need to install Professional, you would need to purchase an additional DVD. However, there are a couple of hacks to get past this.

Please, understand. This is NOT a way pirate a copy of Windows 7. If you install Windows 7 Ultimate, you need an Ultimate key. Period. Your Home Basic key will not work. This method is used to make things easier for technicians.

First, make a directory in the root of your C:\ drive and call it dvd_files and another directory named win_iso. Copy ALL of the files from your install DVD to the newly created dvd_files directory. Now, in the dvd_files directory, navigate to the sources directory and delete the ei.cfg file.


Right, that's it. When this file does not exist, when installing Windows 7, you will see a menu asking which edition of Windows 7 you want to install. You can also edit this file to install a different edition. But, just delete it and you can choose from all of the editions.

Now, we need to make an ISO that can then be burned to a new DVD.

If you don't have Microsoft Windows Automated Installation Kit(AIK) installed, download the iso, burn it to a disk, and install it now.

Once it's installed, from the Start Menu, open Windows AIK's Deployment Tools Command Prompt. Enter the following command:

oscdimg -n -m -bc:\dvd_files\boot\etfsboot.com c:\dvd_files c:\win_iso\windows7.iso

There is NO space between the b and the c. That is NOT a typo. The -n switch allows long file names. The -m switch ignores the maximum size of an image. The first path is to the boot image that the DVD will use. Then next is to the files that will be used to create the ISO. The last is where the ISO will be created. Here's more, if you want to delve deeper into oscdimg.

You may wonder why the Windows AIK is needed. If you use third party tools to create an ISO from the files in dvd_files, it will be incompatible with some older motherboards. The disk will not boot, instead you will receive an error something like, CDBOOT: Cannot boot from CD - Code: 5. This is because Microsoft's "ETFSBOOT.COM program does not handle file versions according to the International Standards Organization (ISO) 9660 specification." Read more about it at Microsoft's website.

Burn the newly created ISO with your favorite third party software and you're done. You can now install any edition of Microsoft Windows 7 using one DVD.

Wednesday, July 7, 2010

Burning an ISO

An ISO is an image of an optical disk--a CD or DVD. ISO's are very useful to PC technicians. ISO's can be downloaded from the internet and burned to a CD or DVD. Also they can be a good way to store disks that are used often. If you scratch or lose a disk(i.e. leave it in a client's machine), simply burn another copy.

This post will show you how to burn an ISO with ImgBurn. ImgBurn is an excellent, light weight image burning utility. Of course, there are many other fine choices available, but ImgBurn is my personal favorite.

First, visit ImgBurn's site and download a copy. It's free and it supports other formats besides just ISO's.

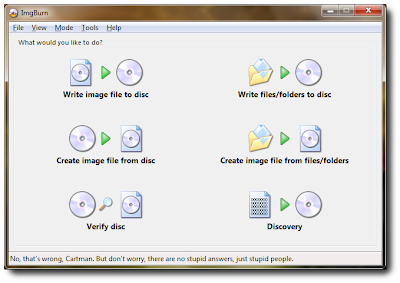
After you download and install it, fire it up. The first screen that you'll see is the "Ez-Mode picker"


Choose the, "Write Image file to disc" option.

Next, you'll see this screen,

Choose the circled icon to select the ISO that you want to burn to disk. After selecting the ISO, you'll be presented with this screen,


Make sure that you have a blank CD or DVD in your burner and then press the button that is circled in the picture above. Next you'll see,


When it completes, that's it, you're done. You now have a freshly burned disk.

You can also create an ISO from optical media. When you fire up ImgBurn, simply choose, "Create Image file from disc" and follow the prompts. Of course, you should not use this software or any other software to make illegal copies of disks.


Wednesday, June 23, 2010

Importing Outlook Data

When a new PC is purchased or the operating system is reinstalled, one common task is importing Outlook data. This is how all of your emails, calendar, contacts, tasks, and notes are saved. This isn't as difficult as some think. After setting up the email account, the .pst file, or Personal File Folder, needs to be imported.

First, make sure that hidden files and folders can be viewed.

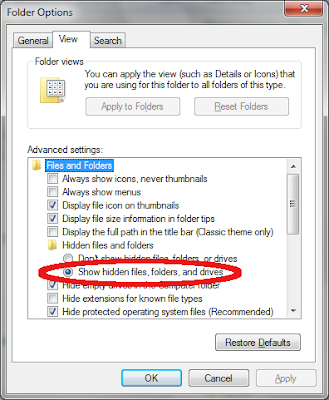
To do this in XP, open My Documents (or any Windows Explorer window) and choose the Tools menu, then Folder Options. After the Folder Options window opens, select the View tab and then select 'Show hidden files, folders, or drives.' Press the Apply button and then OK.

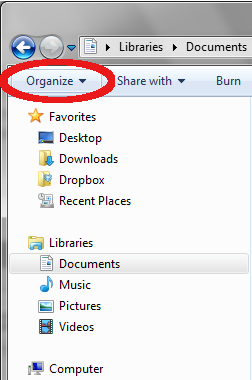
In Vista and Windows 7, open My Documents (or any Windows Explorer window) and click 'Organize.' From the drop down, select 'Folder and search options.' After the Folder Options window opens, showing hidden files is the same as XP.


You can also find Folder Options in the Control Panel. This works on XP, Vista or Windows 7.


Depending on who will be using the PC, you may want to set it back to hiding files and folders after you have backed up the .pst file.

Now we can locate the .pst file. Navigate to:

In XP:

drive:\Documents and Settings\<user>\Local Settings\Application Data\Microsoft\Outlook

In Vista or Window 7:

drive:\Users\<user>\AppData\Local\Microsoft\Outlook\

Replace 'drive' with the drive on which Windows is installed. This is almost always C:. Replace <user> with the user name that you are currently working with.

You are looking for the .pst file. It is usually called Outlook.pst.

Back this up to a network drive, flash drive, optical media, or external USB drive. Of course, if you are to reinstall the operating system this must be done before formatting the hard drive.

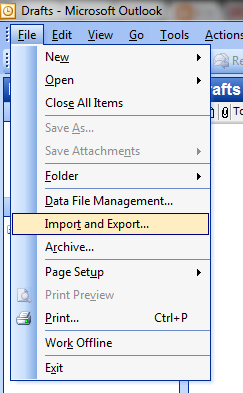
Now, on the new PC or freshly installed PC, open Outlook, choose the File menu and then 'Import and Export...'


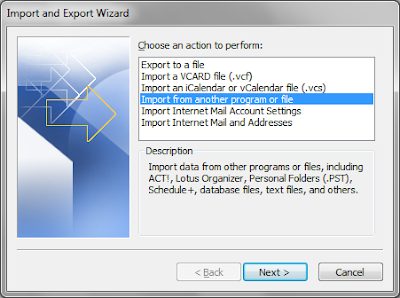
When the Import and Export Wizard window opens, select 'Import from another program or file' and then 'Next.'


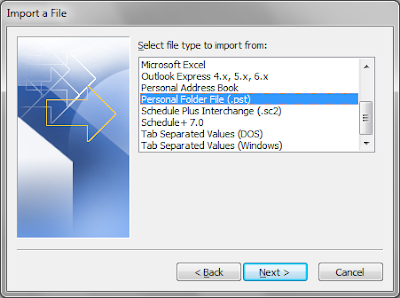
After the 'Import a file' window opens, scroll down and select 'Personal Folder File(.pst)' and then 'Next.'


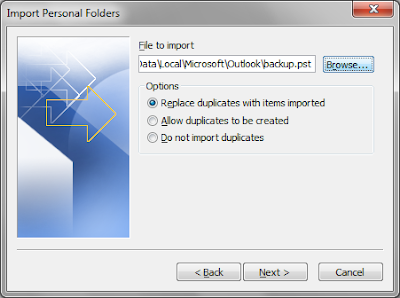
Select 'Browse' and then browse to the location of the .pst file that we backed up earlier. If this is in fact a fresh install or a new PC, it does not matter what you select as far as importing duplicates. Now, click 'Next' and your old emails, calendar, contacts, tasks, and notes have been imported.