Friday, November 27, 2009

Protecting Your PC From Malicious Software

New threats are unleashed upon the internet each day. In this article, threats or malicious software (or malware) refer to a computer virus, worm, trojan, adware, scareware, or any other computer program designed to compromise your Personal Computer. Although, nothing is 100% foolproof, there are a few simple things that you can do to help keep your PC safer.

Install Anti-Virus Protection

First and foremost, install, run, and keep updated a good Anti-Virus program. I recommend AVG, Avira, Avast, or Microsoft Security Essentials. The first three have a free and a pay version. The pay versions offer a little wider protection. However, I recommend any of the three free versions for solid, basic protection. The fourth is a good, new, free product produced by Microsoft that is also worth considering.

You are, obviously, not restricted to these suggestions. But, you must choose something. Whatever your choice, make sure that you keep it running and up-to-date.

Keep Your System Updated

As new vulnerabilities and bugs are discovered, software companies issue patches, hotfixes, service packs, or updates to repair them. Keeping your software up-to-date is critical to protecting your system. As well as the security updates, you will also want to download and install any non-critical enhancements and added features.

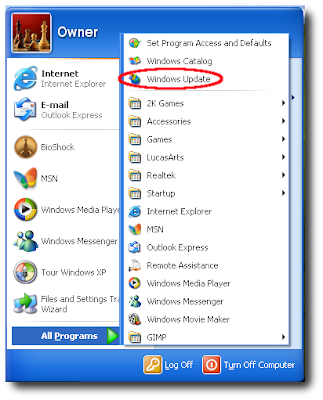
Luckily, keeping Windows up-to-date is pretty simple. To immediately update your Windows XP system, follow this path, illustrated in the following short-hand:

Start>All Programs>Windows Update.


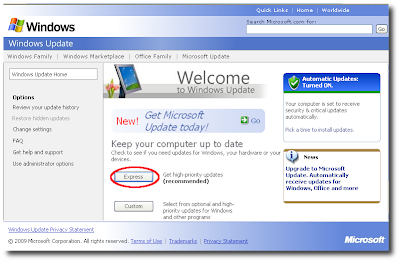
Select the Express method, then download and install the updates.


For Vista or Windows 7:

Start>All Programs>Windows Update.
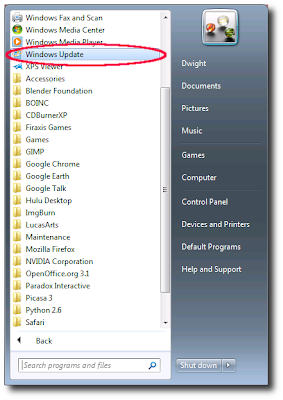

Check for updates. Then download and install them.
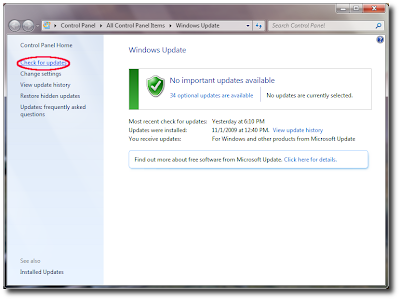
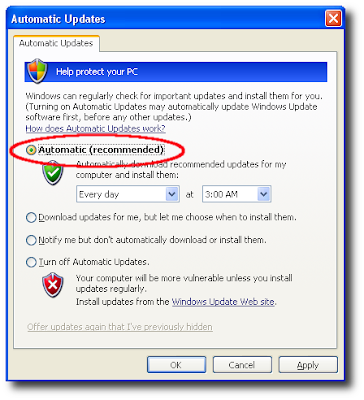
But, even better than that, you should set your system to automatically update it's self. This is easy, as well. In Windows XP:

Start>Control Panel>Security Center>Automatic Updates>Select 'Automatic(Recommended)'


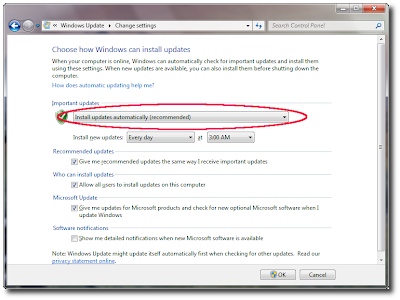
For Vista or Windows 7:

Start>All Program>Windows Update>Change Settings>


To keep up with the latest and greatest innovations on the internet, as well as the latest threats, your web browser must be kept up-to-date, too. If you insist on using Internet Explorer, following the above advice will keep your browser up-to-date along with Windows.

Other browers will keep themselves updated. You might see a pop-up asking you if you want to install updates now or later. Install them as soon as possible. You can check to make sure that you have the latest version on most browers: Help>Check for Updates...

Below is an example of Firefox's Software Update window.


Be sure to keep your Adobe products updated, as well.

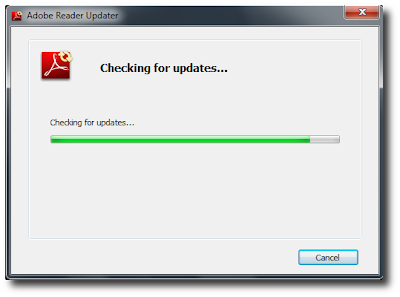
To update Adobe Reader, again: Help>Check for Updates...

Check to see which version of Flash you have installed here. If you do not have the most recent version, download and install it.

Avoid Scams

Whether it's a link on a web site, in an email, in a chat room or a forum post, if it sounds too good to be true, it more than likely is. Avoid clicking any links congratulating you for winning a lottery that you didn't enter or offering free movie or music downloads. A lot of these sites host malicious software.

Be sure to avoid the scare tactics, too. Don't click on any links warning you that you are infected or that your system has been compromised. These are often scams looking to install malicious software on your PC or to get their hands on your wallet one way or another.

Logon With Limited Access

A study conducted a few months ago found that 92% of the vulnerabilties patched by Microsoft in 2008 could have had less impact if the users did not have administrative rights.

Here's what I suggest, give everyone that uses the computer an account with 'limited access.' The accounts with limited access will not have the ability to install new hardware or software. Therefore, you'll have to have one account with administrative privileges. Logon with this account only when you need to add a new account, install new software or hardware, or some other administrative task. Logon with the restricted account to check email, play online games, surf the web, or whatever you need to do on your computer.

Although there are registry hacks to show the Administrator account on the Welcome Screen, you'll probably find it easier to just create another account,
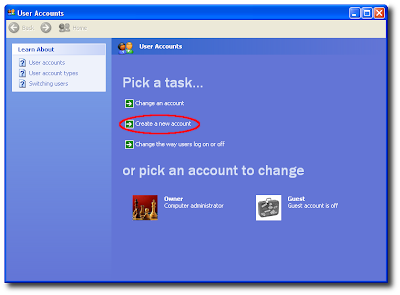


Give your new account a name, make the account type Computer Administrator, and create the account. After this new account is created, logon to your old account and change your account type to limited. Be sure to change any other user accounts to limited, as well.
You should give your new account a password if anyone besides yourself will use the computer. This includes anyone from co-workers to your kid's friends.

Thanks to Tim Biden for Tweeting about this study. Be sure to follow him.

Conclusion

As stated earlier, nothing can keep you 100% safe from the malicious software on the internet. But, following the above advice will tilt the odds in your favor.

Wednesday, October 7, 2009

Windows Keyboard Shortcuts

Using Keyboard Shortcuts rather than always relying on the mouse can save a load of time and therefore, increase productivity. Here are a few of the most useful Windows Keyboard Shortcuts available. I encourage you to try them out for yourself. You may soon be wondering how you got along without them.

Ctrl-A: Select all the items in the current window
Ctrl-C: Copy
Ctrl-V: Paste
Ctrl-X: Cut
Ctrl-Z: Undo
Ctrl-Esc: Start Menu (Useful on some laptops that don't have a Windows Key)
Ctrl-Shift-Esc: Open Task Manager
Ctrl-Tab: Change Child Window(i.e. Change to next tab in web browser)

F5: Refreshes the current window.

Tab: Move to next dialog box

Home: Moves display to top of the active window.
End: Moves display to bottom of the active window.

In the following group, 'Win' refers to the key with the Windows Logo on it.
Win-D: Show Desktop
Win-E: Windows Explorer
Win-F: Search or Find files
Win-R: Open Run dialog box
Win-Break: System Properties Dialog Box
Win-F1: Windows Help & Support Center

Alt-Enter (or Double-Click): Properties for selected object.
Alt-Tab: Switch between open applications
Alt-F4: Close Application/Window
Alt-Esc: Cycle through programs in the order that they were opened.

Shift-F10: Alt-Menu (or Right-Click)
Shift-Delete: Permanently Delete (By passes Recycle Bin)

Monday, October 5, 2009

Windows Won't Boot!

If you are trying to boot to Windows NT, 2000, or XP and receive any of the following errors:

Windows could not start because the following file is missing or corrupt:
\WINDOWS\SYSTEM32\CONFIG\SYSTEM


Windows NT could not start because the below file is missing or corrupt:
X:\WINNT\System32\Ntoskrnl.exe


Windows NT could not start because the below file is missing or corrupt:
X:\WINNT\System32\HAL.dll


NTLDR is Missing
Press any key to restart


Invalid boot.ini
Press any key to restart


Your boot.ini file is missing, corrupted, or has errors in it. The boot.ini file contains a list of the operating systems installed on the hard drive and the boot options associated with those operating systems.

To repair the boot.ini file and get Windows booting again, you must use the Recovery Console. The Recovery Console allows users to perform tasks, using a command line interface(CLI), that will allow Windows to boot again. More on the Recovery Console here.

To use the Recovery Console from an install disk, make sure that your PC is configured to boot to your optical drive(that is a CD or DVD drive) and boot to the install disk.

After Windows Setup has finshed loading, you will be presented with a menu like the following:

This portion of the Setup program prepares Microsoft(R)
Windows(R) XP to run on your computer.
  • To set up Windows XP now, press ENTER
  • To repair a Windows XP installation using Recovery Console, press R
  • To quit Setup without installing Windows XP, press F3

Of course, we want to press 'R' and use the Recovery Console.

Next you will be given a menu asking you to choose which Windows installation to log onto. Enter the number corosponding to the installation that needs to be repaired and press enter. Unless you have more than one operating system installed on your hard drive, you will only be presented with one option.

Now enter the Adminstrator password. If there isn't one, just press enter.

Now type 'cd ..' This will change directories to the root directory.

Next we need to delete the boot.ini file. To do so, the hidden, read only, and system file attributes must be removed. Enter the following commands:

C:\>attrib –h boot.ini
C:\>attrib –r boot.ini
C:\>attrib –s boot.ini

Now we can delete it

C:\>del boot.ini

Next we will use the bootcfg command. We will be using it to rebuild the bad boot.ini file that we just deleted. Read more about bootcfg here.

Enter the following command:

C:\>bootcfg /rebuild

After a few moments, you will see see a list of questions. The anwsers to these questions has been included:

Add installation to boot list? (Yes/No/All): Y
Enter Load Identifier: Microsoft Windows XP Professional Edition
Enter OS Load Options: /fastdetect /noexecute=optin

Obviously, the load identifier will change depending on which operating system you are working with. For further reading on the /fastdetect option. For more on /noexecute=optin

Your boot.ini file became corrupted somehow. Therefore, you should run the chkdsk utility to repair any errors on the harddrive. Please understand that this can take quite a while if you have a large hard drive or if you have a lot of errors. Enter the command:

C:\>chkdsk /r

Next enter the command:

C:\>fixboot

fixboot writes a new boot sector to the system partition.

That's all. We're done. You can now reboot by typing exit.

If Windows still won't boot, you will have to do a repair installation. More on that in an upcoming post.

Friday, October 2, 2009

Missing 'Safely Remove Hardware' Icon

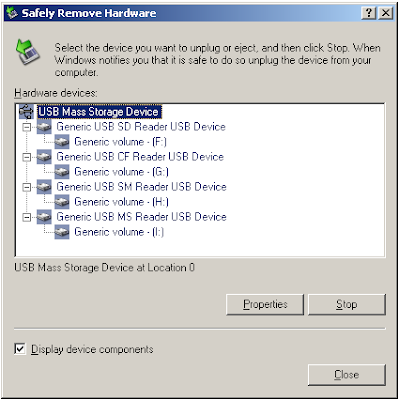
Here's a quick Windows' Tip. To properly remove a USB device, you should use the 'Safely Remove Hardware' icon which is located in the notification area of the task bar. The notification area is in the lower right corner, that is, the area where the clock is.

Simply unplugging a device without using 'Safely Remove Hardware' can cause damage to your files if, say, you are using an external USB storage device.

However, if the 'Safely Remove Hardware' icon is missing from the notification area, you can simply:

Press 'Start'(Also called the 'Windows Button')>Run>Then type 'RunDll32.exe shell32.dll,Control_RunDLL hotplug.dll'


Now you can select the USB device that you wish to remove.

If you find that you need to do this often, you might want to create a desktop Shortcut. To do this, Right click an empty area on your desktop, Select 'New', then 'Shortcut', in the 'Type the location of the item:' dialog box enter 'RunDll32.exe shell32.dll,Control_RunDLL hotplug.dll'. Enter a name for your shortcut and you are finished.

Double-click your new shortcut any time you need to remove a USB device.

Thursday, October 1, 2009

Keyboard Skipping in Internet Explorer

For my first post I thought that I'd write about a problem that I had at work today. A customer was having a problem with his keyboard randomly skipping keys. The problem only occurred when he was using Internet Explorer. Therefore, we could easily conclude that the problem was not hardware related. Otherwise the keyboard would skip no matter the application in use. We could also conclude that the problem must be related to Internet Explorer.

Since the user had a lot of tool bars installed, I suspected the problem was related to an Add-on. Internet Explorer 7 introduced a feature that allows it to be started without any of the Add-ons loaded. To accomplish this:

Start>All Programs>Accessories>System Tools>Internet Explorer(No Add-ons)

This proved my suspicion. The keyboard worked perfectly.

Next, I needed to figure out which of the Add-ons was causing the problem. To do this:

Tools>Manage Add-ons...>Select an Add-on>Select 'Disable'


One way to find our problem Add-on would be to disable each Add-on one-by-one until the offending Add-on is revealed. This may indeed be the only way.

If you know that an Add-on has been recently installed in Internet Explorer or for some reason you have a 'bad feeling' about one of the Add-ons, this would, obviously, be the place to start. Otherwise, disable them one at a time until the problem is resolved.